my etsy shop

Friday, May 31, 2013

Simple All Occasion Cards...


I am not much into making cards. I want to be.  There are so many beautiful handcrafted cards out there.  I have made some in the past and  I find it really hard to sit and come up with some creative and simple ideas.  My goal today was to make at least one card...well I made two!! Woohoo!  They are both similar, but super simple and great  for any occasion., The can be used horizontally or vertically. 


Add caption
Supplies:
Card Stock 8 1/2 x 11 paper, white and dark blue
ColorBok Friendly Forest Paper
October Afternoon 5 & Dime Buttons
Vintage string
Elmers Designer Masking Tape (washi tape)

Tuesday, May 28, 2013

Vintage themed Layout

I have been working on scrapbook layouts for boys, as I have a 3 year old grandson.  I am blessed to welcome a grand daughter into our lives in July.  So I have started working on "girlie" layouts.  Here is one of many I hope to create.  I love the vintage feel of this, and it can be used not only for a "girl" layout, but a wedding photo also.  The only thing missing is a 5x7 photo which will be added soon.
12x12 layout using Echo Park For the Record Collection.

crocheted ribbon and twine added


burlap...


I have entered this layout in the following challenges:

613 Avenue Create:  Anything goes Challenge
Crafts and Me Challenge: #134 Lots of Layers
3 Girl Jam Challenge #19 Anything goes with Ribbon

3 Girl JAM Challenges

Followers


Craftin Desert Divas

Saturday, May 18, 2013

My Art Studio...

Over at Craftin Desert Divas they are having a fun Linky Party challenge where we all get to share photos of our crafting space. Here is my own little craft space. I know I already posted photos of my art studio.  I have added more items to it, so I hope this will be the last blog I do concerning my studio.  But...I just LOVE it and need to share it one last time.

As you walk into my studio this is the far wall...a combination of closet organizers and scrapbook storage cubes.  The top was covered with a 15inch MDF which was painted black.(you can pick up MDF at your local lumber store...and for 25 cents a cut they will cut it to what ever dimensions you want)
The vintage suitcases on floor contain some of the journals I have created.  At one time these journals were in plastic containers.  This is a more pleasant way to store them.

This table we have had for over 25 years...the top was painted black to match the shelves above the cabinets.  The table can easily be moved to the center of the room, and opens up to double in size.  Great for those mini workshops that I hope to have in the near future.

These scrapbook storage cabinets are by Recollections.  I picked them up when they were on  sale, 40 and 50 % off plus I utilized a 15% and 25% coupon on top of the sale. Quite a bargain.  Again there is MDF shelving on top...great for workspace and storage areas. The artwork was done by my daughter a few years back.

I love re-purposing vintage books for my journal creations.  So I had to have an easy way to store them.  This was a cheap black bookcase picked up Walmart.

This is my organized closet.  My husband added an extra closet shelf, which allows more storage.  The closet organizes were topped off with MDF to match the existing shelves in the room.

This shelf can be hung on the wall, or in this case set on top of a table.  It was one of my  cheap flea market finds I spray painted, and it now displays vintage jars filled with vintage buttons, rolls of ribbon and burlap, and a variety of other items.

The jars are filled with left over ribbon.  These jars were left over from my daugthers reception.  The small table top book shelf displays some of my latest creations.

These hardware cabinets can be purchased at your local Walmart or hardware store.  The smaller one I picked up at the flea market for $2.  They are filled with an assortment of brads, clips, rivets, and a variety of embellishments.

Another flea market find was this cd holder...it now holds repurposed cd cases that are labeled and filled with my clear rubber stamps.

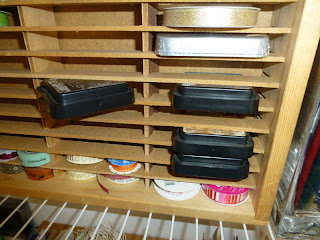
Okay so there is a theme going on here...but this old cassette tape holder I picked up at the flea market...cheap of course and very handy to store my rolls of ribbon, ink pads, and washi tape.
Check out this neat link party:
Craftin Desert Divas

Tuesday, May 14, 2013

Ribbon Storage...

How do we store all that ribbon?  I have lots of it! And like with everything else I have, I like to be able to see it.  That old saying keeps coming back..."out of sight, out of mind"...if I can't see it I tend to forget I have it.  So here are a couple of easy storage ideas...cheap too.  The old cassette  tape holder I picked up a the flea mall for $2.  The glass container was used at my daughter's reception, I have three that I  store on my shelves in my studio.  Great for storing those little pieces of ribbon.
Cassette tape holder, a flea market find for $2!

Holds distressing ink...

Washi tape and small rolls of ribbon...

rolls of ribbon slide in easily...

most ink pads fit....

Glass container....

great for pieces of ribbon...

Sunday, May 5, 2013

Brads, clips, buttons, Embellishment Organizing...


I purchased the case on the left at Walmart..you can find them in the tool section.  The case on the right I picked up for $2 at the flea mall. 

Sort through your embellishments and add to the drawers...

Perfect for having those items at your fingertips.
 I have a ton of brads, clips, buttons, metal embellishments, pins, beads, etc that I like to have readily available for me to use when I am creating something.  You know the saying "out of sight, out of mind".  I have to be able to have my items readily available, preferably where I can see them.  If they are tucked into a draw where I can't see them, I tend to forget I even have it.    This is an easy fix for storing those embellishments.

Organizing your Clear Stamps...

I have a ton of stamps...wooden, foam, clear...you name it I got it.  My biggest problem with clear stamps is organizing them so that you are able to find what you are looking for.  For a while you may  keep putting them back into the package you got them in, but we all know that doesn't last long, and before you know it, you have a draw full of stamp chaos.  Here is an easy solution to remedy that  chaos....
STEP 1: Materials....old CD case, scissors, label maker, and a collection of clear stamps...

STEP 2: Remove covers and middle of CD insert

STEP 3:  Add stamps to front and back of CD case..use a damp cloth to help them adhere

Putting them  in the case is like a puzzle...

STEP 4:  Using your trusty label maker, make the label that best describes the stamps.

STEP 5:  Find the perfect spot  to store them.

Studio Make over...

I have always been blessed to have my own space to work in to create to my hearts content.  Over the past 25 years in this home I have had my own room.  I have created a lot in this room...but it seems I never really was organized.  We are finally doing a major remodeling and of course my studio is on the list.  Purging of things we have held on to for years is tough, but necessary to hopefully have a wonderful creative space.


This is my creative closet...
This is what the room looked like as I was trying to sort through everything...

The storage area is  a combination of closet organizers and scrapbook cubes, the tops are MDF cut to size and painted black.
                                                                                                                                                   It is still a work in progress, but I hope to share with you in the near future, my organizing projects.